
I have always loved creating fun and spooky desserts, especially when Halloween comes around. This year, I decided to make something extra special: a Frankenstein Cake! From the moment I envisioned it, I knew it had to be playful, colorful, and, most importantly, delicious. The idea of green velvet cake layers stacked high with creamy buttercream frosting instantly made me excited to get into the kitchen. As I started baking, I realized that this cake isn’t just for Halloween—it’s perfect for any time you want to impress guests with a creative and festive dessert.
Why you’ll love this recipe is simple: it’s moist, flavorful, and visually striking. The green velvet layers have the perfect texture, soft yet sturdy enough to hold all the frosting and decorations. The cream cheese buttercream adds a rich, tangy sweetness that complements the cake without being overwhelming. Each bite brings together the perfect balance of flavor and fun. Even if you’ve never tried decorating cakes like this before, the detailed piping instructions make it approachable and enjoyable.
Another reason I love this recipe is its versatility. You can make it exactly as described for a classic Frankenstein look, or you can get creative with colors, shapes, and decorations. Turn it into a birthday cake, a Halloween centerpiece, or even a fun weekend baking project with your kids. The frosting is easy to color and shape, allowing you to experiment without stress. This recipe works just as well for smaller or larger cakes, so you can adjust it for any gathering.
It’s also surprisingly budget-friendly. The ingredients are mostly staples you probably already have in your kitchen, and you don’t need any specialty items beyond food coloring and piping tips. Investing in a few tools like a piping bag and tips will allow you to create professional-looking cakes without breaking the bank, and they’ll last for many future projects.
For this Frankenstein Cake, here are the ingredients you’ll need: cake flour, cocoa powder, baking soda, salt, unsalted butter, granulated sugar, eggs, buttermilk, vegetable oil, green gel food coloring, vanilla extract, and white vinegar for the cake. For the buttercream frosting, gather unsalted butter, full-fat cream cheese, powdered sugar, vanilla extract, fine salt, heavy cream, and gel food coloring in black and electric green. You’ll also need a few cake decorating tools like piping bags, piping tips, a cake board, and a spinning cake stand to bring Frankenstein to life.
This cake promises a fun baking experience and a stunning result that everyone will love. From the first layer to the final piped details, you’ll feel proud and amazed by your creation.
How to Make This Frankenstein Cake
Making this Frankenstein Cake is a fun and creative process, and I love how each step builds excitement. It starts with the cake layers, moves to the buttercream frosting, and finishes with decorating Frankenstein’s face. Follow these steps carefully, and you’ll have a show-stopping cake everyone will admire.
Step-by-Step Instructions for Making
1. Prepare the Oven and Pans
First, preheat your oven to 350°F (175°C). Grease and line two 9-inch round cake pans with parchment paper to ensure the cakes come out cleanly. You can also lightly grease the sides and dust them with flour to prevent sticking.
2. Mix Dry Ingredients
In a medium bowl, sift together 2 1/2 cups cake flour, 2 tablespoons unsweetened cocoa powder, 1 teaspoon baking soda, and 1/2 teaspoon fine salt. Mixing these ingredients thoroughly ensures even distribution and a soft cake texture. Set aside.
3. Cream Butter and Sugar
In a large mixing bowl, beat 1/2 cup unsalted butter and 1 3/4 cups granulated sugar until light and fluffy. This should take about 3-4 minutes on medium speed. Be patient here because properly creamed butter and sugar create a tender crumb.
4. Add Eggs and Wet Ingredients
Add 2 large eggs one at a time, beating well after each addition. Then mix in 2/3 cup vegetable oil, 1 1/4 cups buttermilk, 2 squirts of green gel food coloring, 2 teaspoons vanilla extract (alcohol-free), and 1 teaspoon white vinegar. Combine gently until smooth, scraping the sides as needed.
5. Incorporate Dry Ingredients
Gradually add the dry ingredient mixture into the wet mixture, mixing on low speed until just combined. Overmixing can make the cake dense, so stop once there are no visible flour streaks.
6. Bake the Cake
Divide the batter evenly between the prepared pans. Bake for 28 minutes, or until a toothpick inserted in the center comes out clean. Allow the cakes to cool in the pans for 10 minutes before transferring them to a wire rack to cool completely.
7. Make the Cream Cheese Buttercream
While the cakes are cooling, prepare the frosting. Beat 1 1/2 cups unsalted butter with 1/2 cup full-fat cream cheese until smooth. Add 1 tablespoon vanilla extract (alcohol-free) and 1 teaspoon fine salt. Gradually mix in 8 cups powdered sugar, then add 2 tablespoons heavy cream for desired consistency. Use electric green and black gel coloring to achieve the fun Frankenstein colors.
8. Assemble the Cake
Place the first cake layer on a 10-inch cake board atop a spinning cake stand. Spread an even layer of buttercream using a small offset spatula. Add the second cake layer on top and frost the entire cake with a thin crumb coat. Chill for 15-20 minutes to set the base layer.
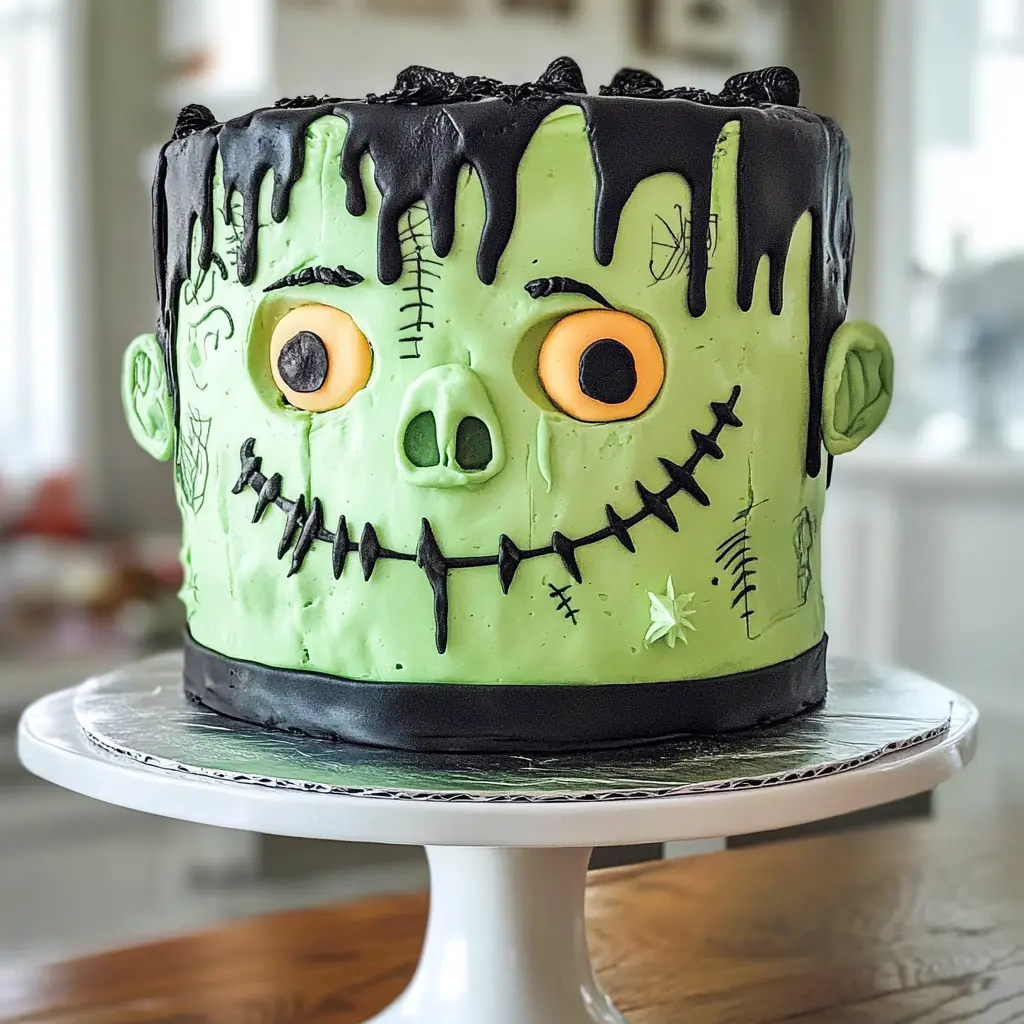
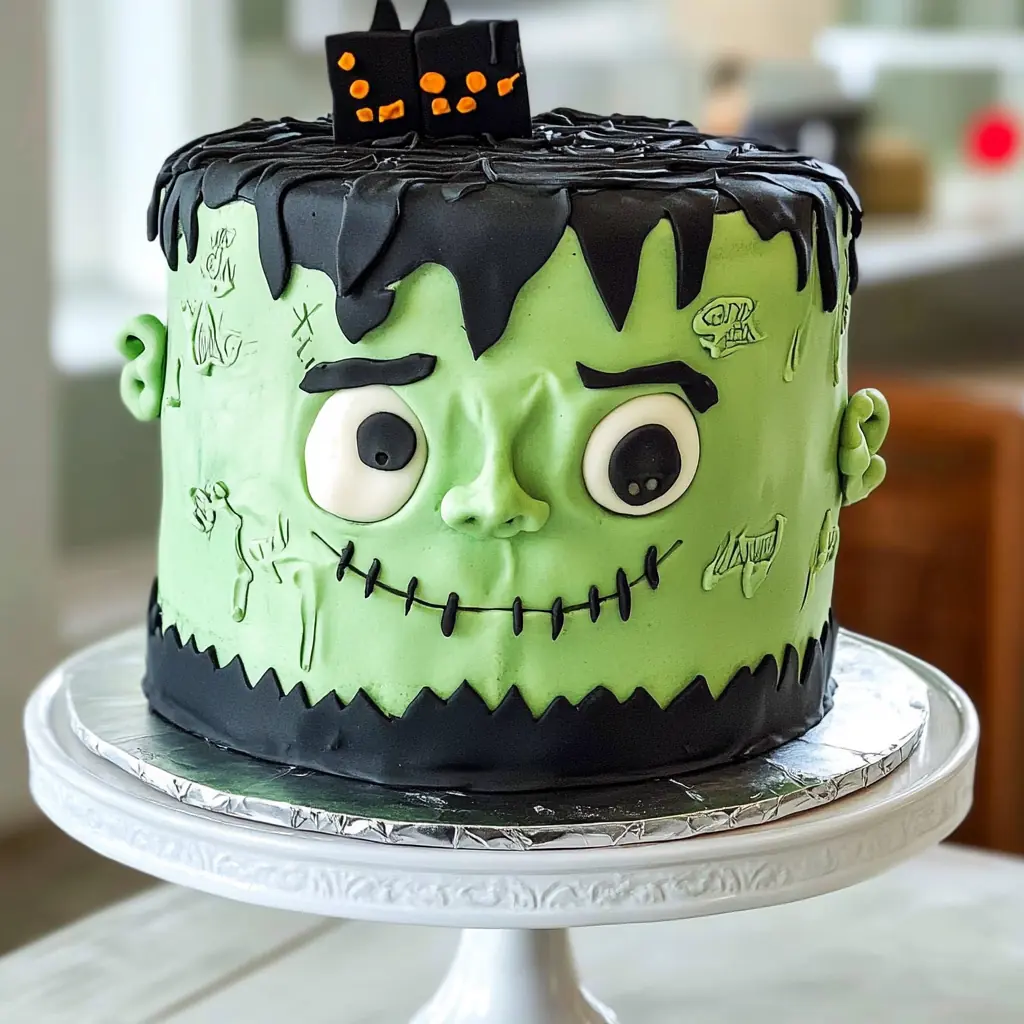
9. Decorate Frankenstein’s Face
Once chilled, frost the cake fully with a smooth layer of green buttercream. Use piping bags and tips to create eyes, stitches, and mouth details with black and green frosting. Add fun features like bolts or scars to bring Frankenstein to life. Take your time, and use reference images if needed.
Quick and Easy Tips
Even though decorating looks complex, breaking it down into smaller steps makes it easy. Prepare frosting colors in advance, and use different piping tips for different details. Working with chilled cakes helps prevent smudging and keeps layers stable.
Customizable Options
You can adjust the color intensity, add edible glitter, or make a smaller version for a personal treat. The cake flavors also pair well with chocolate or vanilla buttercream if you prefer something lighter.
Crowd-Pleasing Factor
This Frankenstein Cake is always a hit at parties. The bright green layers, rich buttercream, and spooky decorations make it fun for kids and adults alike. It’s a dessert that looks impressive while tasting amazing, and I love seeing the smiles it brings.
FAQs About Frankenstein Cake
1. Can I make this cake in advance?
Yes! You can bake the cake layers a day or two ahead and store them tightly wrapped at room temperature. Frosting and decorating are best done the day you plan to serve it, but assembled cakes can also be refrigerated for up to 24 hours.
2. Can I use a different type of food coloring?
Absolutely. You can use liquid, gel, or powder food coloring. Gel is preferred for vibrant green without changing the frosting consistency, while liquid works if you adjust the frosting slightly.
3. How do I prevent the cake from collapsing?
Make sure the layers are completely cooled before frosting. Use a thin crumb coat first to stabilize the cake, then chill it for 15-20 minutes before the final decoration. This ensures the layers stay firm and don’t slide.
4. Can I make this cake smaller or larger?
Yes! Simply adjust the ingredient amounts proportionally. For smaller cakes, reduce the batter and use smaller pans. For larger cakes, double the ingredients.
5. Can I substitute butter or cream cheese in the frosting?
You can use plant-based alternatives if needed, but the buttercream texture may slightly differ. Vegan cream cheese works well with vegan butter for a similar taste and consistency.
6. How do I store leftovers?
Cover the cake tightly and refrigerate for up to 3 days. Bring to room temperature before serving for the best flavor and texture.
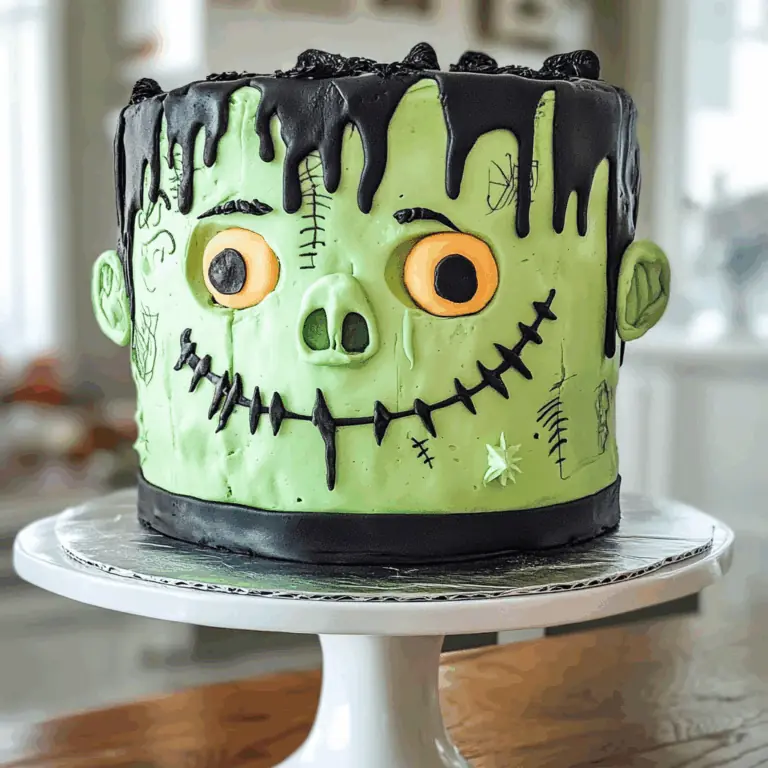
Frankenstein Cake
This Frankenstein Cake is a fun and spooky dessert perfect for Halloween or any celebration. Moist green velvet layers are stacked with creamy cream cheese buttercream, then decorated with vibrant green and black frosting to create Frankenstein’s iconic face. It’s visually striking, delicious, and sure to impress guests.
- Total Time: 108 minutes
- Yield: 20 servings 1x
Ingredients
Cake:
-
2 1/2 cups cake flour (300g)
-
2 Tbsp unsweetened cocoa powder, sifted (10g)
-
1 tsp baking soda (6g)
-
1/2 tsp fine salt (3g)
-
1/2 cup unsalted butter, room temperature (113g)
-
1 3/4 cups granulated sugar (350g)
-
2 large eggs, room temperature (112g)
-
1 1/4 cups buttermilk, room temperature (300g)
-
2/3 cup vegetable or canola oil (145g)
-
2 squirts green gel food coloring (or 1 Tbsp liquid food coloring)
-
2 tsp Vanilla Extract (Alcohol-Free) (8g)
-
1 tsp white vinegar (4g)
Buttercream Frosting:
-
1 1/2 cups unsalted butter, room temperature (339g)
-
1/2 cup full-fat cream cheese, room temperature (113g)
-
1 Tbsp Vanilla Extract (Alcohol-Free) (12g)
-
1 tsp fine salt (6g)
-
8 cups powdered sugar (1000g)
-
2 Tbsp heavy whipping cream (30g)
-
Electric green and black gel food coloring
Tools:
-
10-inch greaseproof cake board
-
Spinning cake stand
-
Small offset spatula
-
1 large piping bag, 3 small piping bags
-
2 large round piping tips, 1 small round tip, 1 tiny tip
Instructions
-
Preheat oven to 350°F (175°C) and prepare 9-inch round cake pans.
-
Sift together cake flour, cocoa powder, baking soda, and salt. Set aside.
-
Beat butter and sugar until light and fluffy. Add eggs one at a time.
-
Mix in oil, buttermilk, green food coloring, Vanilla Extract (Alcohol-Free), and vinegar.
-
Gradually fold in dry ingredients until smooth.
-
Divide batter into pans and bake for 28 minutes. Cool completely.
-
Beat butter and cream cheese for frosting until smooth. Add Vanilla Extract (Alcohol-Free), salt, powdered sugar, and heavy cream. Mix until fluffy.
-
Assemble cakes with frosting between layers. Apply a thin crumb coat and chill 15–20 minutes.
-
Frost the cake fully with green buttercream. Use piping bags and tips for eyes, mouth, stitches, and other decorations in black and green.
Notes
-
Ensure cakes are completely cooled before frosting.
-
Use gel coloring for vibrant shades without affecting consistency.
-
Chill cake between crumb coat and final frosting for stability.
-
Adjust piping designs as desired for a personal touch.
- Prep Time: 20 minutes
- Cook Time: 28 minutes