
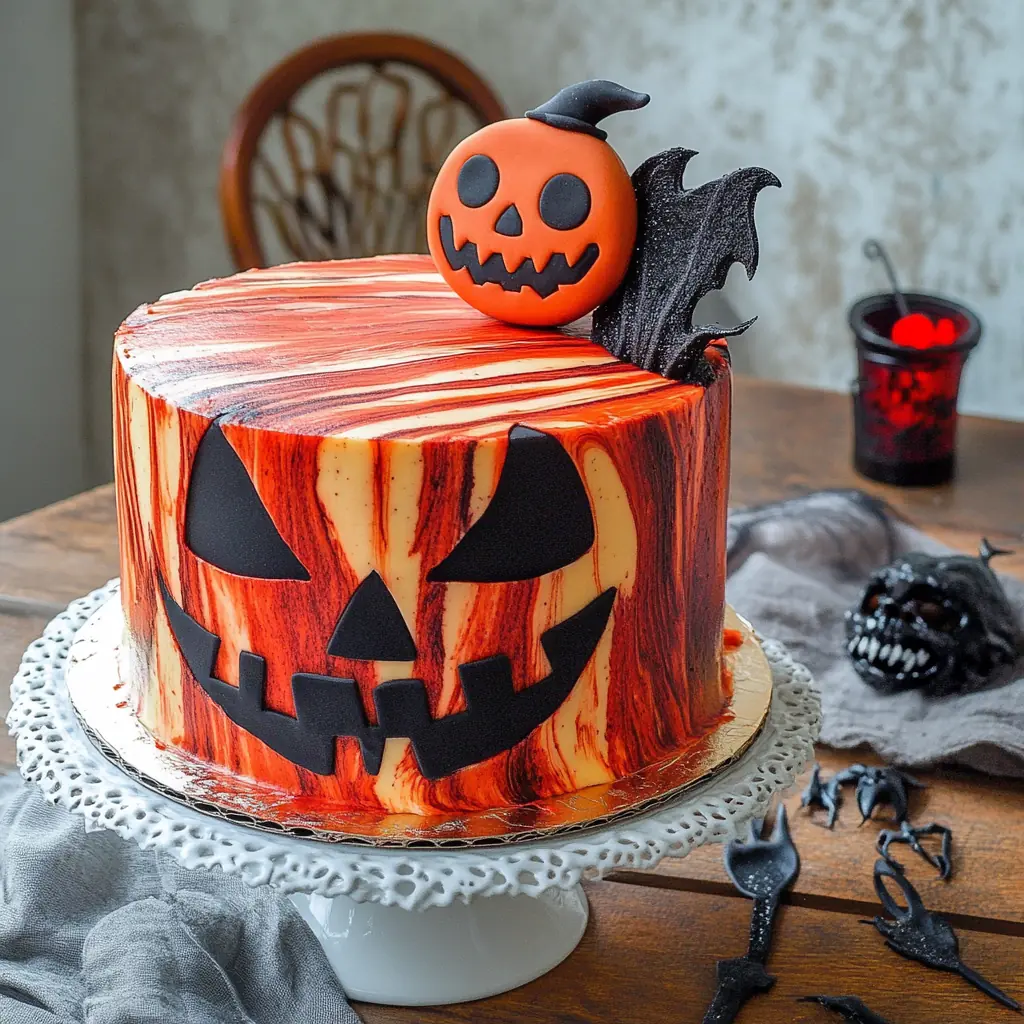
Every Halloween, I love bringing a show-stopping dessert to the table, and this Spooky Halloween Marble Cake has become my tradition. I still remember the first time I made it. The room was dimly lit, plastic bats hung from the ceiling, and fake cobwebs covered every corner. As soon as I sliced into the cake, everyone gasped at the dramatic swirls of deep black and blood-red sponge inside. Because the colors were bold and the texture soft, it instantly became the star of the night. Since then, I have made it every year, and each time, the excitement returns. And yet, this cake is more than a treat. It becomes a fun memory, a moment when spooky meets sweet in the most delicious way.

Because Halloween is all about dramatic surprises, the marble effect is perfect. It creates mystery before the first bite, but it also brings fun as people guess which color pattern they will get. And although it looks like a bakery-level cake, it comes together easily in a home kitchen. Therefore, even if you are busy preparing costumes or decorating, you can still pull off this showpiece. And as soon as your guests see the creepy drips and spooky sprinkles, they will think you spent hours in a professional kitchen.
Why You Will Love This Recipe
First, this cake is visually striking and full of rich chocolate flavor. And yet, it still feels light and moist thanks to the buttermilk. Also, the spooky “blood” effect makes it ideal for parties.
Versatile
Although this version is perfect for Halloween, you can easily switch colors for birthdays or themed events. Moreover, you can change decorations to suit any celebration.
Budget-Friendly
Even though it looks extravagant, most ingredients are pantry staples. Because of that, you will not need any special tools or expensive items. You simply need gel colors and candy sprinkles to finish the theme.
Ingredients for the Recipe
-
All purpose flour
-
Baking powder
-
Baking soda
-
Salt
-
Unsalted butter
-
Vegetable oil
-
Sugar
-
Vanilla Extract (Alcohol-Free)
-
Eggs
-
Buttermilk
-
Bittersweet chocolate
-
Black gel icing color
-
Red gel icing color
-
Powdered sugar
-
Natural unsweetened cocoa powder
-
Water or cream
-
Salt
-
Red candy melts
-
Heavy whipping cream
-
Halloween sprinkles
Because the ingredients are simple and the method is approachable, this cake is perfect for beginners and experienced bakers alike.
How to Make This Recipe
When I prepare this spooky marble cake, I always start by organizing every ingredient. Because baking is a precise process, I find that preparation makes everything smooth. First, I preheat the oven to 350°F (176°C). Then I grease three 8-inch cake pans and line the bottoms with parchment rounds, since that prevents sticking. Additionally, I dust the sides lightly with flour. That way, each layer releases cleanly and keeps its shape.
Next, I whisk together flour, baking powder, baking soda, and salt in a bowl. Because combining dry ingredients first gives a lighter crumb, I never skip this step. Meanwhile, in a separate microwave-safe bowl, I melt the bittersweet chocolate in short 20–30 second bursts. Then I stir until smooth and glossy. After that, I allow it to cool slightly. Because hot chocolate could scramble eggs in the batter later, cooling is important.
Step-by-Step Instructions for Making
First, I beat the butter, oil, and sugar in a large bowl until the mixture turns fluffy. And since aeration creates a tender cake, I keep beating for at least two minutes. Then I add the eggs one at a time. Because eggs emulsify the batter, I ensure each one mixes fully before adding the next. After that, I mix in the Vanilla Extract (Alcohol-Free). Moreover, I scrape down the sides to catch any unmixed bits.
Next, I alternate adding dry ingredients and buttermilk. I begin with dry ingredients, then buttermilk, and I repeat until everything combines. Additionally, I stop mixing as soon as I see a smooth batter. Overmixing can toughen the cake, so gentle blending matters. Meanwhile, I divide the batter evenly into three portions. Because marble cakes rely on separate colors, I tint one portion black using gel color and another portion red. I keep one portion plain.
Then I spoon dollops of each color into the cake pans. I alternate colors and fill evenly. After that, I use a butter knife to gently swirl the batter. Since I want bold streaks, I swirl only a few times. Too much swirling blends the colors. Next, I bake the layers for 20–25 minutes, until a toothpick comes out clean. Then I cool the cakes in pans for 10 minutes. After that, I transfer them to wire racks to cool completely. Cooling prevents frosting from melting later.
Meanwhile, I prepare the frosting. First, I beat the unsalted butter until creamy and smooth. Then I add powdered sugar gradually, because adding it all at once creates lumps. After that, I whisk in cocoa powder and salt. Additionally, I add Vanilla Extract (Alcohol-Free) and water or cream to reach a spreadable consistency. Because darker frosting enhances the spooky look, I mix in black gel icing color until the shade turns deep and eerie.
Next, I level the cake layers with a knife if needed. Then I place the first layer on a serving board. After that, I spread frosting evenly on top. Additionally, I repeat with the second layer and then the third. Once stacked, I apply a thin crumb coat. Because this seals crumbs, my final layer looks clean. Then I chill the cake for at least 20 minutes. Cooling allows the frosting to firm.
Quick and Easy
Although this cake looks dramatic, the steps remain straightforward. Because each step flows naturally, the process feels manageable. Also, gel color ensures vivid shades without complicated mixing. Therefore, this recipe works even if you are new to baking layered cakes.
Customizable
Moreover, you can change colors for different themes. For example, orange and purple work beautifully for a playful Halloween. Additionally, you may use different sprinkles or candy toppers. Because the base recipe stays the same, décor freedom remains large.
Crowd-Pleasing
Finally, this cake always impresses friends and family. The moist crumb, rich chocolate, and spooky effect make every slice exciting. And since dramatic desserts create memories, this treat becomes the highlight of every Halloween table. After making it once, you may find yourself returning to it every October.
FAQs
Can I bake this cake in advance?
Yes, you can bake the layers one day ahead. Because cooling and resting improve structure, the cake sets beautifully. Moreover, you can wrap layers tightly and store them at room temperature. However, if your kitchen is warm, you may refrigerate them, but bring them to room temperature before frosting for a soft texture.
Can I use regular food coloring instead of gel?
While you can, gel color works better. Because the marble effect depends on intense pigment, gel delivers bold colors without thinning the batter. Liquid color may water down the texture. Therefore, for rich red and black swirls, gel is highly recommended.
Why did my cake come out dense?
Dense texture usually happens if the batter is overmixed or the butter is not properly creamed. Therefore, beat butter and sugar until fluffy and stop mixing once ingredients combine. Also, measure flour accurately, since too much flour can weigh it down.
Can I frost the cake without coloring it black?
Yes, you may. Although black frosting enhances the spooky theme, vanilla or chocolate frosting works too. Additionally, you can decorate with colorful sprinkles or candy eyes for a playful look.
Can I skip the drip?
Yes. While the bloody drip adds drama, the cake tastes delicious even without it.
Spooky Halloween Marble Cake
This Spooky Halloween Marble Cake features dramatic swirls of red and black sponge layered with rich chocolate frosting. Additionally, a haunting red candy drip and creepy sprinkles turn it into the perfect Halloween centerpiece. Because the texture is moist and the flavor is rich, this cake satisfies chocolate lovers while thrilling guests with its spooky design.
- Total Time: 2 hour 5 minutes
- Yield: 12–14 slices 1x
Ingredients
-
2 1/4 cups all purpose flour
-
2 1/2 tsp baking powder
-
1/4 tsp baking soda
-
1/2 tsp salt
-
1/2 cup unsalted butter, room temperature
-
1/2 cup vegetable oil
-
1 1/2 cups sugar
-
1 tbsp Vanilla Extract (Alcohol-Free)
-
4 large eggs
-
1 cup buttermilk
-
5 oz bittersweet chocolate, chopped
-
Black gel icing color
-
Red gel icing color
-
2 1/4 cups unsalted butter
-
8 cups powdered sugar
-
1 cup natural unsweetened cocoa powder
-
2 tsp Vanilla Extract (Alcohol-Free)
-
5–7 tbsp water or cream
-
1/4 tsp salt
-
Black gel icing color
-
4 oz red candy melts
-
2 tbsp heavy whipping cream
-
Halloween sprinkles
Instructions
-
Preheat oven to 350°F (176°C). Grease three 8-inch pans, line with parchment, and dust edges lightly with flour.
-
Whisk flour, baking powder, baking soda, and salt together. Set aside.
-
Melt chocolate in the microwave in short bursts, stir smooth, and allow it to cool slightly.
-
Beat butter, oil, and sugar until fluffy. Add eggs one at a time, mixing well after each addition. Stir in Vanilla Extract (Alcohol-Free).
-
Alternate adding dry ingredients and buttermilk. Begin with dry ingredients and end with dry ingredients. Mix only until smooth.
-
Divide batter into three bowls. Tint one portion red, one portion black, and leave one plain.
-
Spoon alternating dollops of batter into pans. Swirl gently with a knife to create marble patterns.
-
Bake 20–25 minutes, or until a toothpick comes out clean. Cool in pans 10 minutes, then transfer to wire racks to cool fully.
-
To make frosting, beat butter until creamy. Gradually add powdered sugar. Mix in cocoa powder, salt, Vanilla Extract (Alcohol-Free), and water or cream until smooth. Tint with black gel color.
-
Level cake layers if needed. Stack each layer with frosting between. Apply a thin crumb coat and chill 20 minutes. Then frost the cake completely.
-
For the drip, melt candy melts with cream until smooth. Let cool slightly. Drip over chilled cake edges and let it run down naturally.
-
Decorate with spooky sprinkles and let the cake set before slicing.
Notes
-
Do not overmix the batter to keep the cake light.
-
Chill the cake before adding the drip for neat drips.
-
Gel food coloring gives deeper color without thinning batter.
- Prep Time: 1 hour 45 minutes
- Cook Time: 20 minutes